Showing posts with label cooking. Show all posts

Tuesday, May 15, 2012

new beginnings: parmesan baked eggs

I have (finally!) finished my Master's degree, so now it's on to new frontiers.  Specifically, I will be a library media specialist in an elementary school this fall, and we're moving next month.  I'm also ready to reinvigorate this blog, if only to fill the gap in my time left by the absence of school work (good riddance!).


It's fitting that I'm thinking of new things at this time in the year, when farmer's markets are reopening and little green shoots are arriving in CSA boxes.  The best thing to do with those tender greens is to treat them very gently, if at all.  Better yet, pair them with a perfectly cooked egg.  I love this recipe for parmesan baked eggs from Pinch of Yum because it's simple and quick, yet it feels decadent to dip toasts into rich orange egg yolks.  All it needs are some lightly dressed spring greens for a well-rounded dinner.


Parmesan Baked Eggs

Pay close attention to the tops of the eggs and try to stick to the time recommendation.  They may not seem done, but don't overcook as you don't want the yolks to get hard.  The eggs will continue cooking a bit as they sit.

1/2 tbsp butter
1/2 tsp oil
1 shallot, minced
1 tbsp fresh rosemary, minced
1/2 tbsp fresh thyme, minced
1/2 tsp Kosher salt
6 eggs
1 tbsp heavy cream (or half and half)
freshly grated Parmesan cheese


In a small saucepan, heat butter and oil.  Add shallot and saute until soft and fragrant, 3-5 minutes. Add herbs and salt; remove from heat and stir to combine.  The mixture should be somewhat coarse and just a little buttery.


Preheat the oven to 375.  Place a small pat of butter (about 1 tsp) in the bottom of each of 3 ramekins.  Place in oven until butter is melted.


Remove ramekins from oven, add 1 tsp of cream to each, and crack 2 eggs into each ramekin without breaking the yolk.  Sprinkle the her mixture over the top of each ramekin and return to the oven.  Bake for about 7 minutes.

Turn up the heat to the broil setting and let the eggs broil for another 1-2 minutes.  Remove from oven when egg whites are just set and yolks are still soft.  Let stand for 3-5 minutes before serving.  Season with salt and pepper and sprinkle with cheese.  Serve with broiled hearty bread rubbed with a garlic clove on both sides.

Wednesday, August 17, 2011

all good summer things

I have been criminally lax about updating this blog, especially for the summertime!  In my defense, I've had a full course load this summer, but I have a few weeks between summer classes and fall classes to try and be productive.  I am going to really make an effort to update things this fall, if for no other reason than to feel like I'm doing something.


Anyway, I thought it was about time I posted a recipe.  We made this a few weeks back with one of the first summer tomatoes (from the farmer's market--we killed our tomato plant).  We also happened to have an abundance of blue cheese leftover from another meal.  We always have basil (out back), crusty bread, and our old standby, Sashay Acres bacon, on hand.  A meal was born.

Actually, we ate this as an appetizer, but it would be more than enough as an entree.  I only stacked our salads a few tomato slices high, but next time I'd go even lower--one or two slices only--for easier eating.  Next time I also think I'll splurge on the fancy French gray shallots at the farmer's market for more intense shallot flavor in the dressing.

Heirloom Tomato Salad with Bacon, Blue Cheese, and Basil
very slightly adapted from Gourmet via Epicurious
serves 2 (easily multiplied)


2 slices crusty white bread, like sourdough
4 slices bacon (depending on how porky you like your veggies)
olive oil (if needed)
1/4 c finely chopped shallot
3 tbsp Sherry vinegar
2-3 assorted medium heirloom tomatoes, cut 1/4- to 1/3-inch thick
15 small fresh basil leaves
1 1/2 oz blue cheese, at room temperature, crumbled

Cook bacon in (cast iron, preferably) pan until crisp, and remove to paper towels.  Leave bacon drippings in pan.

In the same pan, toast bread on both sides in bacon drippings over medium heat.  If you don't like your bread bacon-y, pour off drippings into a heatproof bowl and reserve.  Heat about a tablespoon of olive oil in the same pan and toast bread.

Using remaining bacon drippings (pour them back in the pan if you poured them off), plus a couple tablespoons olive oil if the pan is getting dry, cook shallots over medium heat, stirring, until softened, about 2 minutes.  Add vinegar and simmer, whisking, until emulsified, about 1 minute.  Season dressing with salt and pepper and keep warm.

Crumble bacon.  Arrange bread on plates and divide tomato slices among them, stacking slices and sprinkling some basil and bacon between slices. Sprinkle cheese and remaining basil and bacon over and around tomatoes. Spoon some of warm bacon dressing over and around tomatoes and season with salt and pepper.

Sunday, May 8, 2011

happy mother's day


Today on Mother's Day I'm thinking about how much of my cooking abilities and interests are because my mom also loved to cook.  I have often observed that I was never taught to do things like cut fruits and vegetables--I just sat and watched my mom.  I know how to make basic meals without a recipe the same way my mom did, which oftentimes I think she learned from her mom.  I hope I can pass that knowledge along someday.  I also give her credit for helping me develop my tastes in food.  She introduced me to different flavors from early on and set the ball rolling for me to expand my tastes more and more.   Cooking and eating are such a big part of my life and I enjoy sharing it with my mom still.  Thanks, Mom!


Orecchiette with Broccoli Rabe and Goat Cheese
from Serious Eats (I think there's a missing step in their recipe, so I've filled in the blanks below with what I did.)

1 lb broccoli rabe, chopped
1/3 c extra-virgin olive oil
6 garlic cloves, chopped
3/4 tsp crushed red chile flakes
12 oz orecchiette (I can never find orecchiette at my grocery store, so I used a short-cut pasta that looked close enough.)
2 tbsp lemon zest
4 oz goat cheese, sliced 
salt
 

Pour about 8 quarts of water into a large pot, add a few tablespoons of salt, and bring it to a boil. Toss in the broccoli rabe and cook for 4 minutes. Remove it with a pair of tongs and immediately toss it in some ice water. Chill for a few minutes then drain and pat dry.

Heat the olive oil in a large skillet on medium heat.  Add the garlic and red pepper flakes and saute 1-2 minutes until garlic is just golden.  Add the broccoli rabe and cook 3-5 minutes until stalks are tender and the leaves wilted.

Meanwhile, bring the pot of water back to a boil and cook the orecchiette according to the directions on the box. Taste the pasta with a minute left on the timer. If al dente, turn off the heat, drain the pasta, and transfer it to the skillet. Turn the heat to high, add the lemon zest, and season with salt. Cook for a minute, stirring constantly.

Transfer the pasta to bowls or plates. Add a bit of goat cheese to each one. Serve.

Monday, April 18, 2011

easy french onion soup

Okay, so here comes the second soup post in a row.  But that's because I could probably eat soup every other day.  And it's an easy meal to make hearty and yet vegetarian.  The soup I made used chicken broth, but could easily be made with a nice homemade veggie broth.  I keep scraps of veggies and chicken or other meat bones in large bags in the freezer, then when I need broth, I just pop the contents of the bag into the crock pot, covered with water, and cook it on low for 18-24 hours.  How long you let it go depends on how strong you want your broth and how stinky you are willing to let your house get.  Ha.

french onion soup on Matt's grandma's handmade hotpad

I liked that this recipe was simple, but I thought it was just a tad bit too simple, so I added a couple of garlic cloves and some dried thyme to the onions.  Then it seemed just right.

 you know it's good--look at that doggy snout trying to get at it!


Quick, Light French Onion Soup
slightly adapted from Serious Eats
serves 4


1 pound sweet white or yellow onions, peeled and thinly sliced
2 cloves garlic, thinly sliced
1 tsp dried thyme
2 cups dry white wine, such as Muscadet
2 tablespoons butter
6 cups chicken or vegetable stock, preferably homemade
1 bay leaf
4 slices crusty bread or baguette
2 cups (5 ounces) freshly grated Gruyere cheese
Preheat the oven to 500°F. Combine the onions, garlic, thymewine, butter, and a large pinch of salt in a baking dish and cook, uncovered, until the wine is absorbed almost completely into the onions, and they are tender and golden, 45 minutes or perhaps a little longer.
In the meantime, bring the chicken or vegetable stock and bay leaf to a simmer in a large saucepan. Season to taste with salt and pepper.
When the onions are finished, divide them among 4 deep broiler-safe bowls. Cover the onions with chicken stock to fill the bowls, and place a slice of bread on each. Distribute the grated cheese over the bread and broil until the cheese is golden and bubbling, 2 to 3 minutes. 


Sunday, April 10, 2011

early spring warmth

We're still at a point in the spring season where we'll see chilly and rainy and generally miserable days, so I still need soup.  But I'm definitely getting to the point where I want lighter, more vegetable-based foods.  This soup provided a nice balance.


I love Cook's Country's take on posole, but I can only take that fatty, pork-filled stew so often.  This potato soup begins with a similar pureed onion and chili base.  I opted for a can of crushed fire-roasted tomatoes instead of crushed fresh, but if you have nice fresh tomatoes around, go for it.

I also wanted to add another texture or flavor, and debated between frozen sweet corn or hominy.  I decided on hominy this time to keep the flavors smoky and earthy like the pork posole.  If I make this later into the spring or summer it would be nice to use frozen or fresh sweet corn to brighten up the whole soup.

Mexican Potato Soup
adapted from Serious Eats
1 lb boiling potatoes, peeled and diced (about 2 cups)
Kosher salt 
28-oz can crushed fire-roasted tomatoes or 3 large red ripe tomatoes, about 1 1/4 pounds, peeled and coarsely chopped
1 medium onion, coarsely chopped (about 1 cup)
2 cloves garlic, coarsely chopped
1 canned chipotle in adobo sauce, coarsely chopped
2 c homemade chicken or vegetable stock (of course, go for veggie broth if you want it vegetarian)
28-oz can hominy (optional)
1/3 c cilantro, finely chopped
Place in large saucepan and cover with water by about three inches. Season water with salt. Bring to a boil and cook until tender but firm to the bite (potatoes will cook further in step 2). Drain potatoes and set aside. Meanwhile, blend tomatoes, onion, garlic, and chipotle pepper in blender at high speed until smooth, about 30 seconds.
Pour tomato mixture into large saucepan. Add vegetable stock and potatoes. Stir to combine and season to taste with salt. Bring to a boil over medium-high heat. Reduce heat to medium and simmer until potatoes are completely tender, about 7 to 8 minutes. For thicker broth, mash a few potatoes against side of pot with wooden spoon. Add cilantro and hominy (if using) simmer for 2 minutes longer, or until hominy is warm. Serve immediately with extra cilantro and sour cream (I use Greek yogurt) as desired. 


Sunday, March 27, 2011

gorgonzola tortellini


Awhile back I picked up a package of gorgonzola tortellini from a great Madison pasta maker, RP's.  Our local grocery store just started carrying it again to my delight.  Anytime I can buy a local product I'm happy, but especially so when the product is high quality and not prohibitively expensive.  I figured I'd find something to do with it and went searching for a recipe.

 gorgonzola tortellini with walnut cream sauce
on my favorite Charley Harper book!

What do you know, but RP's has suggested recipes at their site for their pastas!  I gladly accepted the suggestion, but added some sauteed mushrooms and peas.  The vegetables brought some much-needed freshness to the otherwise heavy dish.  I also swapped the sour cream out for non-fat Greek yogurt, which may have been the reason my sauce was less than smooth.  I'll take any pointers anyone has for keeping a cream sauce from breaking!  In any case, the texture was not ultimately affected since the final addition of ground walnuts makes the sauce lumpy anyway.

Oh, and this is the prequel to the mascarpone post from the other day.


Gorgonzola Tortelloni with Walnut Cream Sauce
adapted from RP's Fresh Pasta
serves 2

I used less pasta then the recipe called for, but kept the sauce ingredients the same, since I like a saucy pasta.  If you like things a bit drier, cut back the sauce ingredients or up the pasta to 1 lb.

1/2 c walnuts
9 oz  RP's Fresh or Frozen Gorgonzola Tortellini
3 tbsp butter
5 crimini (baby bella) mushrooms, sliced
1 clove garlic crushed
1/3 c milk
1/2 c sour cream or plain yogurt
1/3 c mascarpone cheese
1 c fresh or frozen peas
1/4 tsp salt

 Heat an empty pan over medium heat and cook walnuts until browned.  Grind toasted walnuts in a food processor or spice grinder.  Wipe out the pan carefully with a paper towel. 

Return pan to heat and melt 1-2 tbsp butter.  Cook mushroom slices in butter until browned and cooked down, about 5 minutes.  Add garlic and cook 1-2 more minutes.  Add milk, sour cream or yogurt, and mascarpone.  Add peas and bring to a light simmer and reduce slightly.

Add ground walnuts and salt.  Boil gorgonzola tortellini until tender and top with sauce. Garnish with chopped fresh parsley.

Friday, March 25, 2011

breakfast of champions

You know how you buy an ingredient for a recipe, use the tiniest scoop, then have the majority of it left to deal with?  How sometimes those things go bad before you can find a use for them?  With the recipe I found, a leftover container of mascarpone is not a problem. 

strawberry mascarpone grilled cheese

 This sandwich was inspired by a recipe for a mascarpone and Nutella grilled cheese topped with strawberries, but if I bought a jar of Nutella, I'd be in the same mess all over again.  And as good as Nutella is, I didn't want it around to chocolify every breakfast.  So, I cut the Nutella and put the strawberries inside the sandwich.  Also, the recipe called for brioche, which I couldn't find at my local grocery store, so I went with challah.  I was pleasantly surprised that the challah I got happened to be orange-flavored.  That meant the bread was the sweetest part of the sandwich, with the cheese mild and creamy and the strawberries a welcome tartness.


Tomorrow, I might put bananas with the strawberries.  Or maybe I could top the strawberries with some fresh basil and make a sweet, syrupy balsamic reduction to dip the sandwich in.  I was just telling my friend that my incredibly technical grad courses this semester are killing my creative brain.  I hope today a little of that brain came back!


In my tweens, I developed a fail-proof system for making grilled cheese (since that was basically all I could cook).  Butter both pieces of bread, then place them buttered sides together on the cutting board, so as not to get butter everywhere.  Ingenious, right?  I thought so.  Anyway, then put your cheese and whatever else on top of the bread stack you made, then when you're ready to cook them, separate the buttered pieces and assemble the sandwich in the pan.  This worked well for me today, since I could add one more smear of mascarpone to the top piece of bread before closing the sandwich.


Strawberry Mascarpone Grilled Cheese
adapted from Sweet & Saucy (be forewarned--the blog plays music)

4 slices brioche or challah bread
2 tbsp butter
2-4 tbsp mascarpone, as much as your heart desires
6 strawberries, rinsed and sliced

Butter one side of each slice of bread.  Then smear 1-2 tbsp mascarpone on the other side of each slice.  Place strawberry slices, overlapping, on top of mascarpone.

Heat cast iron skillet to medium heat.  Cook sandwiches until browned on each side.  Attend to the pan carefully, since these went from golden to black for me very quickly.  Also, turn with care since the mascarpone doesn't really stick the slices together like a slice of American cheese would.

Thursday, March 24, 2011

graham...crackers?

I happen to have a lot of Japanese posts to make lately, but in the interest of showing that I do not only eat Asian food, I'll post a good ol' American burger recipe today.  Actually, I'm just going to share the instructions for the onions.  If you're like me, you know how to make sandwiches and burgers.  You just need some ideas for different toppings sometimes.  Even my beloved chipotle caramelized onions get old.

bison patty with brie, quick-pickled red onion, garlic mayo, and greens on ciabatta

The onions atop Graham Elliot's Grahamburger are simple enough that I'll be making them many times in the future and flavorful enough that they stand out against a meaty burger patty.  The vinegar and oil marinade gives the onions a kick that actually makes them seem fairly fresh and bright.  The only change we'd make to this next time is to grill the top of the bun as well, a la the chargrilled lamb burger from The Breslin restaurant in NYC (no, we didn't take a trip there--I saw it on "The Best Thing I Ever Ate: Burgers").  The ciabatta bun was a tasty and substantial, but got a little bready on top and needed some crunch.


Quick-Pickled Red Onions

Follow the link above to see full burger recipe.

1 c apple cider vinegar
1/2 c olive oil
1 lg red onion, thinly sliced 

Mix vinegar and oil in a medium bowl and toss onion slices in the mixture.  Let sit for at least 10 minutes.  

Heat grill pan over medium until very hot. Pat marinated onions dry and grill until soft and colored, about 3 minutes per side. Remove to bowl. 

Tuesday, March 22, 2011

tv dinner

So, I've already missed my goal of blogging every day during break.  Last night the internet was out for awhile in the evening, and then I fell asleep on the (very orange) couch.  Oh well.


I had already enjoyed Makiko Itoh's Just Bento and Just Hungry websites, so when Serious Eats posted recipes from her Just Bento Cookbook, I was ready to jump on the chance to try some reliable and fairly simple Japanese recipes.  By the way, I just found out that Makiko lives what must be an amazing life split between Japan, Switzerland, and Southern France.  Wow.


My first foray into Just Bento recipes was Chicken Karaage - Japanese fried chicken.  I typically avoid frying foods at home, but this sounded too great to pass up.  Unfortunately for my health, but fortunately for my taste buds, this frying adventure led to several more fried dishes in the following weeks.

The recipe called for boneless chicken thighs, which I was unable to find, so I struggled with pulling the bones out of a package of thighs.  I do recommend using thighs, despite the hard work.  All the fatty strains liquefied and just made the already juicy dark meat even more succulent.  I opted to leave the skin off this time, but I'm sure my husband would have appreciated the inclusion of the skin.

The chicken karaage was meant to be a bento meal for the following day's lunch, but after our first bite, we couldn't stop eating until it was all gone.  Best TV dinner ever.


Chicken Karaage
from the Just Bento Cookbook by Makiko Itoh via Serious Eats

This recipe was intended for one serving for a bento lunch.  I quadrupled the recipe to use a 1-lb package of chicken thighs and it served two, although it could serve more if you are not as gluttonous as we were!  We dipped our chicken pieces in green onion sauce as we ate them, but I'd be interested to see what the texture would be like if I followed the directions and dipped them right after frying.

1 lb boneless chicken thigh, with or without skin, cut into 3–4 pieces  
4 tsp soy sauce (if you are not making the green onion sauce, increase to 2 tsp) 
4 tbsp sake 
4 tsp peeled and grated fresh ginger 
vegetable oil, for deep-frying 
8 tbsp cornstarch (or enough to cover chicken pieces)
handful green salad leaves or other vegetable
cooked short-grain rice
For the green onion sauce: 
4 tbsp rice vinegar 
4 tbsp soy sauce 
4 tbsp finely chopped green onion
Pinch sugar
A few drops sesame oil  
4 tsp peeled and grated fresh ginger

Combine the chicken, soy sauce, saké, and ginger. Let marinate for at least 10 minutes or overnight. (If you need to leave it marinating for more than 12 hours, omit the soy sauce and add it 10 minutes before cooking, or the salt will draw out too much moisture from the chicken and make it dry.)
 
Remove the chicken pieces from the marinade, drain, and coat in the cornstarch.

Heat 1 inch (2.5cm) of vegetable oil in a saucepan over medium-high heat. Test the oil temperature by putting a little of the cornstarch-and-marinade coating on the end of a wooden chopstick and dipping it into the oil. If the coating sizzles and turns brown immediately, the oil is hot enough. If the oil starts getting smoky, turn down the heat.

Fry the chicken pieces in the oil, turning once, until a deep golden brown. Drain well on paper towels.

To make the green onion sauce, combine all the ingredients in a small frying pan over medium heat and stir until the sugar is dissolved. Put the chicken pieces in the pan and toss to coat each piece with the sauce.

Let cool completely before packing into a bento box. Putting a layer of arugula or other salad leaves under the chicken enhances the color of the chicken and provides another texture in the bento.

Note from Serious Eats: You can cook chicken karaage the night before. If I’m making this for dinner, I usually set aside a few pieces for the next day’s bento. Chicken kara-age can be frozen uncooked and marinated, or cooked. To freeze it uncooked and marinated, put the chicken and marinade (excluding the soy sauce) into a freezer bag. Defrost in the refrigerator in a bowl, adding the soy sauce before frying. Cooked frozen pieces can be defrosted in the refrigerator, then crisped up for a few minutes in a toaster oven. I don’t recommend defrosting cooked pieces in a microwave, since this will make the chicken tough. 

Sunday, March 20, 2011

friday night pizza

I'm on spring break for the next week, so my goal is to blog every day--I definitely have plenty of pictures backed up.


On Friday nights I often feel like "junk food" to wind down the week and kick off the weekend.  Sometimes it's a burger or nachos.  Last week it was pizza.  As spring creeps out of hiding more and more, I find myself wanting to eat more fruits and vegetables.  On the other hand, it's still chilly at night and I want something hearty.  So, I made a vegetarian pizza, but one with enough heft to fill me up.  Meaty veggies like zucchini, eggplant, roasted peppers, or mushrooms are a must.  This one involves roasted marinated mushrooms and zucchini.  The marinade with its soy sauce for salt and maple syrup for sweetening may sound a little crunchy-granola, but trust me, it gives the whole thing a lot of depth.  The recipe is from a whole foods (and I think vegan?) cookbook, so the original recipe didn't include cheese, but--hey--this is Wisconsin.

I am typically not ambitious enough to make my own pizza dough on any night of the week, but I am certainly not in the mood on Friday nights.  I'd tried various flatbreads and pre-made crusts with some success, but I really liked the pita-marketed-as-pizza-crust from Kontos that I tried this time. The chewy, crispy crust was topped with the rich and tangy roasted and marinated veggies, a smoky and garlicky sauce, and melty fresh mozzarella.  It was a hit and will certainly reappear in the summer when the vegetables are available locally.

My only complaint is that the zucchini left a bit of unwanted liquid behind under the cheese, so next time I would squeeze out some of the excess water before placing it on the pizza.


Rustic Tomato Thin Crust Pizza with Roasted Zucchini, Portobello Mushroom, and Red Onion
slightly adapted from The Balanced Plate by Renee Loux

Try this with a sprinkle of aleppo pepper or some peperoncini and a nice beer like New Glarus apple ale!

3 tbsp + 2 tsp olive oil
1-2 garlic cloves, minced
1 tsp balsamic vinegar
1 tsp soy sauce
1/2 tsp maple syrup
2 tsp fresh thyme or 1 tsp dried (optional)
1 large portobello mushroom or 5 baby bella (crimini) mushrooms, thinly sliced
1 medium zucchini, thinly sliced
Kosher salt
Black pepper
2 round flatbreads (6"), 2 tortillas (9"), or 1 large flatbread (9'-12')
1/2 c tomato sauce, purchased or homemade (see below for recipe)
2-4 oz fresh mozzarella, sliced

1/2 c thinly sliced red onion
6 cherry tomatoes, halved

Preheat the broiler.  In a small bowl, mix together 1 1/2 tbsp olive oil, the garlic, balsamic, soy sauce, maple syrup, and thyme (if using).  Pour over the mushroom and toss to coat evenly.  Let stand for 10 minutes or more to absorb and develop flavor.

In a separate bowl, toss the zucchini with 2 tsp of olive oil.   Sprinkle with a pinch of salt and pepper.  Place both the mushroom and zucchini on a baking sheet under the broiler until browned, about 10-12 minutes.  Set aside to cool.  When cool enough to handle, gently press on the zucchini with a paper towel until the vegetable has released most of its excess water.

Preheat the oven to 500 degrees Fahrenheit.  Brush one side of the bread or tortillas with the remaining 1 1/2 tbsp of olive oil.  Place the oiled side face down on a baking sheet or pizza stone.  This will make it crisp nicely.  Spread the sauce evenly over the bread or tortillas, leaving just a 1/4" border at the edge.  Distribute the mushroom and zucchini evenly.  Cover with the mozzarella slices, then sprinkle the red onion slices and cherry tomato halves over the top of the cheese.

Bake on the middle rack for 15-20 minutes, until the edges are golden brown.  Let cool enough to cut and serve.


Quick Tomato Sauce

28-oz can fire-roasted diced tomatoes
3-4 cloves garlic, minced
olive oil

Drizzle about 1 tbsp olive oil in a large saucepan.  Heat on medium heat, then add the garlic and saute for 1-2 minutes, until beginning to brown.  Add can of tomatoes with juices and cook, stirring frequently, until liquid is mostly cooked off and the sauce is thickened.  Add salt if you like.

Sunday, February 20, 2011

eat your veggies

creamy cauliflower and pasta

I love cauliflower.  Raw, cooked, in cheese sauce, and especially in this pasta.  Luckily, my husband, who is usually cauliflower-averse, also likes this pasta.  The cauliflower is meant to be creamy and fall-apart tender.  Really it just melts in with the pasta and Parmesan.  I made this once before, but didn't cook the florets long enough--trust me, you don't want the cauliflower tender-crisp in this case.  I also added in a can of diced tomatoes this time, which added to the pizza-type flavor of this dish along with the garlic, oregano, and cheese.  I used the end of a block of Wisconsin Parmesan to top the pasta, but recently I bought a chunk of Parmesan from Hook's cheese out of Mineral Point.  It's by far the best Parmesan I've ever tasted and would have made this meal even better.  Alongside a piece of baguette slathered with roasted garlic, the whole wheat pasta and cauliflower made this a hearty (and fairly healthy) winter meal.

Every time I browse through my favorite cookbook, Simply Organic, I find more to try.  This recipe is located in the "deep winter" section of the book, but I'm looking forward to trying it again when we can get local cauliflower from our CSA or the farmer's market.  And, as a side note, we signed up for the CSA through Amazing Grace once again.  So excited for spring to come!


Creamy Cauliflower and Pasta
from Simply Organic by Jesse Ziff Cool

1 head cauliflower, cut into florets
1 lb whole wheat pasta, such as shells or rotelle
1/3 c olive oil
4 garlic cloves, thinly sliced
1/2 c dry white wine
15-oz can diced tomatoes, drained (optional, but recommended)
1 1/2 tbsp chopped fresh oregano or 1 1/2 tsp dried oregano
1/4 c kalamata olives, pitted and chopped (I omitted these--we're not olive fans.)
1 tsp red pepper flakes
4 sprigs fresh Italian parsley, stemmed and chopped
Salt & freshly ground black pepper
1/4 c shredded Parmesan or Asiago cheese

Bring a large pot of salted water to boil over high heat.  Add the cauliflower and cook for 5 minutes, or until tender.  Remove with a slotted spoon to a medium bowl, reserving the water.  Cook the pasta according to the package directions in the reserved water.  Drain and transfer to a large serving bowl.

While the pasta is cooking, in a large skillet heat the oil over medium-high heat.  Add the garlic and cauliflower and cook for 5 minutes, stirring and breaking the cauliflower into bite-sized pieces.  Add the wine, oregano, tomatoes and olives (if using), and red-pepper flakes and cook for 3 minutes, or until the cauliflower is very tender.  Add the parsley and season with salt and pepper to taste.  Pour over the pasta and toss to coat well.  Top with the cheese.

Saturday, February 19, 2011

one pound

 
pork and lemon meatballs

I know I've mentioned before that when I'm not cooking meatless dishes, I try to stretch our meat to make several meals.  Whenever I buy a pound of ground meat (lamb, beef, buffalo, or pork), I plan to make two recipes with it.  This week the meat of choice was a package of wonderfully fatty ground pork from a local farm that supplies our bacon and the recipes were both knock-outs: pork and lemon meatballs and pork and scallion dumplings.  This is a two-for-one recipe post, outlining how well you can eat if you have just one pound of pork.

pork and scallion dumplings

First, a meatball recipe from a favorite Serious Eats column, Dinner Tonight.  I have two or three meatball recipes that I rotate, but this one stands out.  The pork is mixed with breadcrumbs, herbs, anchovies, Parmesan, and some lemon, then dredged in flour before frying in butter and olive oil to create a nice crispy coating.  Then chicken stock is added with the meatballs, which I thought might have made the meatballs soggy, but it actually had the effect of making the coating into a velvety glaze.  I want to try other meatball recipes with this technique!  The flavor was great too--the Parmesan and anchovy provided nice depth.  The citrus and pork combination reminded me a bit of the delicious Laotian lemongrass pork sausage I had at Lao Laan Xang awhile back.


Pork and Lemon Meatballs
from Serious Eats
serves 2

The recipe here is halved from the original since I wanted the other half pound of pork for dumplings later in the week.  Click the link above for the original recipe.

1/4 c flour 
3/4 c fresh breadcrumbs 
1/2 lb ground pork
Juice and zest of 1/2 lemon 
2 tbsp parsley leaves, chopped
6-8 springs thyme, leaves removed
3 tbsp grated good-quality Parmesan 
5 anchovy fillets, minced (or about a tbsp anchovy paste, if you keep that on hand like I do)
salt and pepper 
1 tbsp olive oil 
1 1/2 tbsp butter
3/4 cup chicken stock
1 pound cooked couscous or pasta (I made couscous with butter, salt, and chicken stock.  Yummy!)
 
Sprinkle flour on large baking sheet. Combine breadcrumbs, pork, lemon zest and juice, parsley leaves, thyme, Parmesan, and anchovy filets (or paste) in large bowl. Add good pinch salt and pepper and mix ingredients thoroughly by hand. Shape into 18-20 balls, about heaped tablespoon each, and put on floured baking sheet.
 
Heat olive oil and butter over medium heat until butter melts and foam subsides, then roll enough meatballs that will fit comfortably in skillet in light coating of flour. Cook until golden all over, in batches if necessary, 10-12 minutes total. Avoid moving unless necessary to promote caramelization.
 
Pour off most of fat from skillet and add chicken stock. Bring to a boil and reduce for 2-3 minutes. Serve with pasta or couscous and juices from pan.

*  *  *
Tonight we enjoyed the following pork dumplings.  Recently we've tried a couple different methods of cooking dumplings.  I made gyoza which were meant to be fried, then doused with water to steam.  Those fell apart when we added the water.  On New Year's Day, I made shrimp and cilantro shu mai, which were very tasty, but stuck to the basket when I tried to steam them (should have sprayed the basket first!).  This recipe called for the dumplings to be simmered in a pot of water, which has been the most successful technique yet.  The directions say to fish the dumplings with a slotted spoon, but I seem to have lived on my own for 6 years without picking up that kitchen tool.  We tried just dumping the contents of the pan through a strainer, but the force of the water tore some of the dumplings.  I finally just pulled them out with a regular spoon.  Needless to say, I will be purchasing a slotted spoon soon, plus one of those handy little wire skimmers.

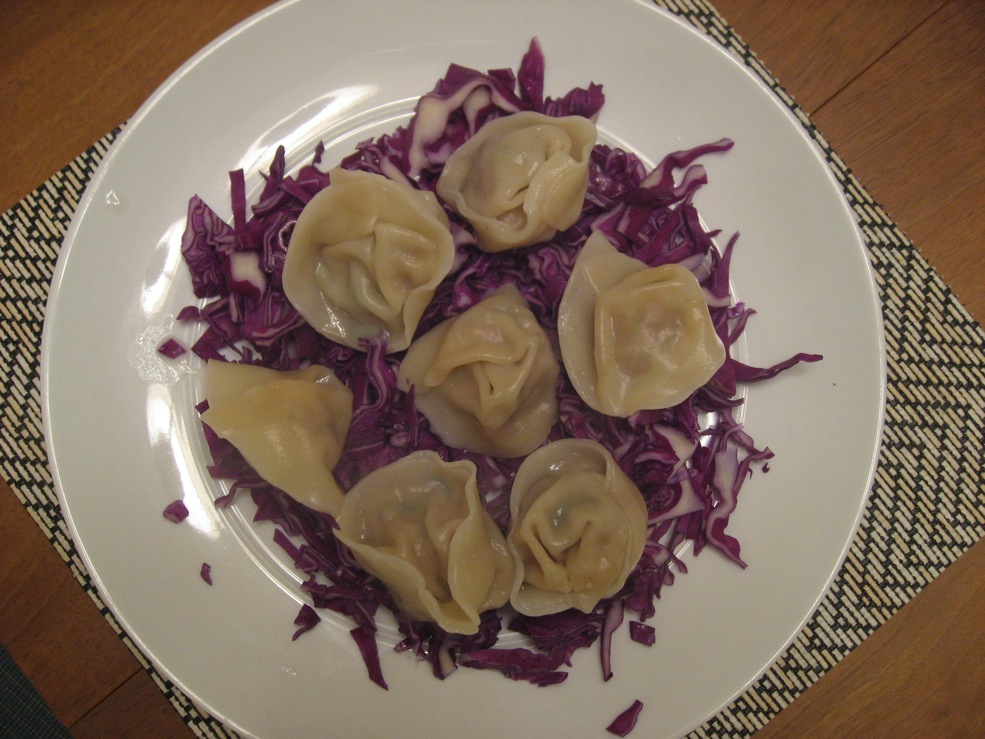
In any case, these were very flavorful and pretty easy.  If you're like me, you'll have most of the ingredients on hand and will only have to pick up a few items.  I actually had half a package of dumpling wrappers left over from the New Year's shu mai, so I really only had to pick up scallions.  I love it when I can use up what I already have in the freezer or cabinet!  I served them on a bed of red cabbage for a bit of freshness and crunch.  I could see serving them the same way for a party--they can be frozen in advance and cooked as needed which would be ideal for entertaining.


Pork and Scallion Dumplings
from Epicurious
serves 2 as a main dish (24-30 dumplings)

We had a bit of pork leftover, which made yummy a few meatballs with some panko thrown in.


1/2 lb fatty ground pork
1/2 tbsp Shaoxing wine (I substituted sherry)
1/4 tsp Asian sesame oil
1/2 tsp Vietnamese chile-garlic sauce (preferably Huy Fong brand)
1 1/2 tsp finely grated peeled ginger
1/2 tsp rice vinegar (not seasoned)
2 tsp soy sauce
1/2 tsp kosher salt
Pinch of white pepper
3 tbsp finely chopped cilantro stems
3 tbsp finely chopped scallions, flowering chives, or flat Chinese chives (garlic chives)
24 to 30 round dumpling (gyoza) wrappers

Make the dipping sauce by mixing all the following ingredients and let it sit while you make the dumplings.

1/2 c soy sauce
1/3 c water
1/2 tbsp Shaoxing wine (or sherry)
1/8 tsp Asian sesame oil
1 garlic clove, smashed
3 (2-inch) dried red chiles, wiped clean
1/8 tsp sugar

Combine all filling ingredients (except cilantro stems, chives, and wrappers) in a large bowl, then stir in cilantro stems and chives. Set bowl in a larger bowl of ice to keep chilled while forming dumplings.

Place a slightly rounded teaspoon of filling in center of a wrapper and moisten area around filling with water. Fold in half to form a crescent and press to seal. Moisten one corner and bring corners together, pressing them, to form a tortellini-shaped dumpling. Repeat with remaining filling and wrappers.

Cook dumplings in a large pot of gently simmering water until pork is just cooked, about 3 minutes. Transfer with a slotted spoon to a platter.

Sunday, February 13, 2011

meatless with mushrooms


This week was a pretty good week for animals.  We had several vegetarian meals, which were all very yummy.  This meal will be my first official "Meatless Monday" link for the Midnight Maniac blog (whose author I was delighted to discover is a fellow Wisconsinite!).  Our vegetarian attempts have recently become even more appealing, as our trip to Japan helped Matt and I both get over our mushroom "issues" once and for all.  Their earthy, meaty qualities were perfect for these flavorful meatless tacos.


I was able to whip this up fairly quickly since I had roasted and peeled the hot peppers earlier in the week to make our own rendition of this decidedly meat-ful torta (I'll leave description for another post).  I am about ready to start roasting up a huge batch of peppers--poblano, red, yellow, orange, and otherwise hot--on the weekends to have on hand all week for sandwiches, salads, soups, and the like.  I could also use a vat of roasted garlic in the fridge at all times.

Anyway, I digress.  I simplified the taco recipe a bit by switching out fresh epazote for dried oregano and omitting the coxita cheese.  I also used some frozen fresh salsa I stored away last fall instead of making the salsa quemada, though it sounds quite tasty as well.  Next time we thought we'd add a bit of Greek yogurt (our go-to sour cream substitute), but overall this turned out very well.  But look out--for us this made a ton of filling.  I'll be eating this as a salad topping all week!


Mushroom, Rajas, and Corn Tacos with Queso Fresco
adapted (slightly) from Epicurious

2 Anaheim chiles
1 poblano chile
1 c frozen or fresh corn kernels (about 1 ear)
1 1/2 tbsp olive oil
Kosher salt
1/2 white onion, peeled and cut into 1/2-inch dice
1 lg clove garlic, thinly sliced
6 oz cremini or white button mushrooms, trimmed and quartered
1 tsp oregano, preferably Mexican
Fresh-ground black pepper
1/2 c queso fresco, cut into small cubes
6 warm corn tortillas
Salsa quemada or your favorite salsa
Cilantro sprigs

Roast the chiles as for rajas.  If you have a gas stove, it's simple to quickly char the skin on the peppers directly over the gas flame.  If you're like me and are stuck with electric, it's not much more difficult.  I roast the peppers under a hot broiler in a small pan lined with foil for about 5 minutes on each side, staying nearby to check every so often, until all sides are blackened and beginning to blister.  Put the peppers in a plastic zippered bag and seal for about 15 minutes, or until the chiles have cooled and the skin is readily peeled.  Pull the stem from the top and strip the skin from the peppers, then remove the seeds and cut into 1/2-inch dice.

Heat a heavy pan (preferably cast iron) over medium-high heat until very hot.  If using frozen corn, place corn in colander and rinse until thawed.  Allow to drain and dry somewhat before the next step.  In a bowl, toss the corn with 1 teaspoon of the olive oil and a sprinkling of salt. Spread the corn in the hot pan and let it blacken slightly, without stirring, for 30 seconds. Have a lid ready in case the kernels begin to pop. Remove the roasted corn from the pan.  In the same pan, heat 2 teaspoons of the olive oil. Add the onion and diced chiles and cook, stirring often, until the onion is soft and beginning to brown. Season lightly with salt and remove from the pan.

Reduce the heat and add the remaining olive oil. Add the garlic and mushrooms. Cook, stirring often, until the mushrooms are cooked through, 2 to 3 minutes. Return the corn and chiles to the pan and stir to reheat.  Turn off the heat and stir in the oregano, black pepper, and queso fresco.
To assemble the tacos, spoon some vegetables onto a tortilla. Top with a generous tablespoon of salsa. Top with cilantro and sour cream or Greek yogurt, if desired.

Friday, December 31, 2010

new favorite


The people at Cook's Country magazine come across as mad food scientists.  They make and remake and mess with and test a recipe so many times that it makes me impatient just reading about it.  The result is typically a reliable recipe, but sometimes involves ingredients I'd rather not keep on hand (anybody keep apple brandy in the cabinet??).

In the case of their "New Mexican Pork Stew", the result is a delicious and fairly simple posole.  When deciding to make this recipe, I did something I really shouldn't do.  I decided to make an ethnic dish from a recipe when I had never tasted any other version of the dish, good or bad.  I've attempted this foolishness with varied results.  Spanikopita was only so-so.  Korean bulgogi was actually pretty great.  And so was this posole.  The problem is, I don't know whether these recipes even begin to approximate the authentic dish.  If you're some kind of posole expert, please enlighten me.  I guess when it comes right down to it, I don't particularly care--this stew is that good.

Many meals in our home either start out spicy or get some kind of spice added to them later (red pepper flake, jalapenos, sambal).  This was not one of those meals, and yet we both found it immensely satisfying.  The ancho chiles, which Wikipedia tells me are a dried poblano, are not particularly spicy.  Instead, they are smoky and earthy.  Between the chiles and the intensely corny hominy, this dish reminds me of the first particularly earthy Mexican dish I ate, a tortilla soup at La Mestiza in Madison.  This is one recipe that will be going into our regular rotation.

One major benefit of Cook's Country (and they don't pay me to say this) is the mad scientist's report on the process which led to the recipe.  While mind-bogglingly involved, it does provide the justification for each step of the recipe that might seem unnecessary, like, say, browning hominy.  Steps that I might be tempted to skip, which would be very silly of me.  I will not be typing up Cook's Country's introduction to the recipe.  Just trust me and follow the directions.  As a side-note, the pork ribs from our butcher had little bones in a few of them, but they had no adverse effect.  Just pull them out when you shred the pork.  Also, my grocery store doesn't carry 15-ounce cans of hominy, so I went with two huge 28-ounce cans.  The more hominy, the better, I say.


New Mexican Pork Stew (Posole)
from Cook's Country-January 2011

3/4 oz dried ancho chiles (about 3 chiles)
8 c low-sodium chicken broth (I used homemade)
2 lbs boneless country-style pork ribs
salt & pepper
3 tbsp vegetable oil
3 (15-oz) cans white hominy, rinsed and drained well
2 onions, chopped
5 garlic cloves, minced
1 tbsp minced fresh oregano (or 1 tsp dried)
1 tbsp lime juice
chopped avocado, cabbage, and radishes for serving (optional)

Adjust oven rack to middle position and heat oven to 350 degrees.  Place chiles on baking sheet and bake until puffed and fragrant, about 6 minutes.  When chiles are cool enough to handle, remove seeds and stems.  Combine chiles and 1 cup broth in medium bowl.  Cover with plastic wrap and microwave until bubbling, about 2 minutes.  Let stand until softened, 10 to 15 minutes.

Pat pork dry with paper towels and season with salt and pepper.  Heat 2 tablespoons oil in Dutch oven over medium-high heat until just smoking.  Cook pork until well browned all over, about 10 minutes.  Transfer pork to plate.  Add hominy to now-empty pot and cook, stirring frequently, until fragrant and hominy begins to darken 2 to 3 minutes.  Transfer hominy to medium bowl.

Heat remaining oil in now-empty pot over medium heat until shimmering.  Add onion and cook until softened, about 5 minutes.  Stir in garlic and cook until fragrant, about 30 seconds.  Puree onion mixture with softened chile mixture in blender.  Combine remaining broth, pureed onion-chile mixture, pork, oregano, 1/2 teaspoon sald, and 1/2 teaspoon pepper in now-empty pot and bring to boil.  Reduce heat to low and simmer, covered, until meat is tender, 1 to 1 1/2 hours.
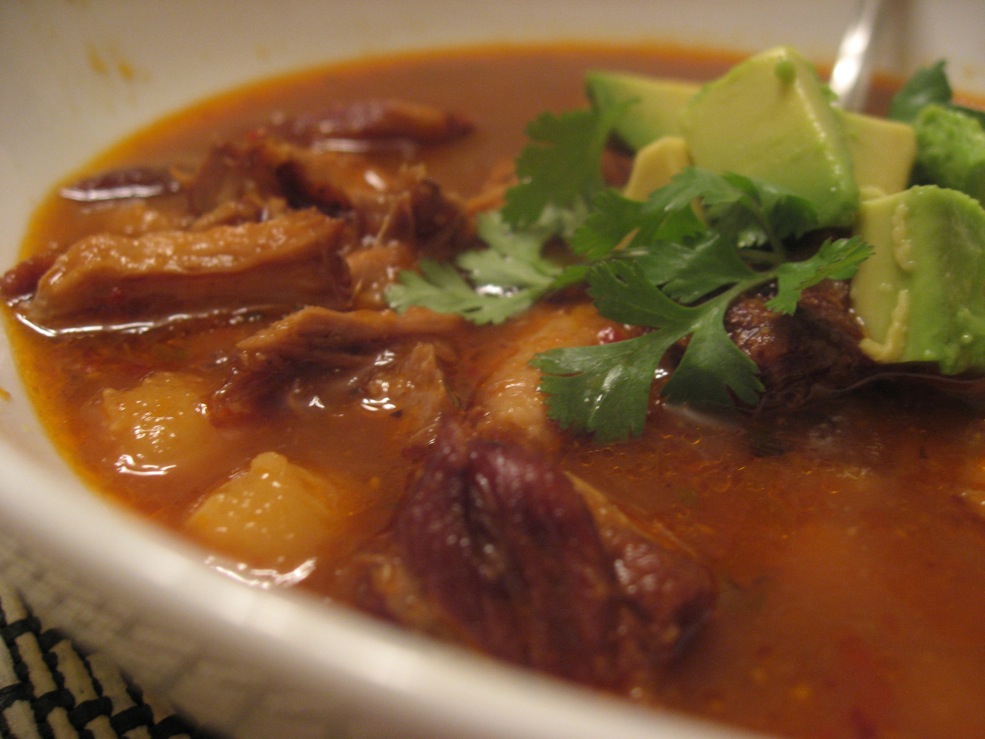
Transfer pork to clean plate.  Add hominy to pot and simmer, covered, until tender, about 30 minutes.  Skim fat from broth.  When meat is cool enough to handle, shred into bite-sized pieces, discarding fat.  Return pork to pot and cook until heated through, about 1 minute.  Off heat, add lime juice.  Season with salt and pepper.

Posole can be refrigerated in airtight container for 3 days.  We did not really skim the fat off the soup, thus the shiny spots in the photo.  We did, however, scrape some of the congealed, bright-orange fat off the top of our leftovers before reheating.  Only some though.  Matt's turned me into an animal-fat fan.

Sunday, September 26, 2010

1 chicken 4 ways: number 4

Finally I'm getting around to telling you how I finished using the beer-can chicken--after about a month of avoiding it.  Whenever I make a whole chicken, the last step is using the bones to make chicken broth.  I made a summery zucchini basil soup from the last batch of broth.  If you've got zucchini coming out of your ears, this is a great way to use quite a few up.  I happened to be overrun with pattypan squashes at that time, and they worked just as well.  I wasn't happy with any of the available recipes that I found, so I combined a couple.

Creamy Basil Summer Squash Soup
adapted from myrecipes and epicurious

This soup gets nice and creamy and tastes like summer.  We liked it topped with grated parmesan, roasted red pepper strips, and pine nuts.

1 tbsp olive oil
1 large onion, diced
2 lbs zucchini or other summer squash, chopped (about 6-8 cups)
4 c reduced-sodium or homemade chicken broth
1 c loosely-packed rinsed basil leaves
2-4 garlic cloves, coarsely chopped
1/4 tsp cayenne pepper (optional)
salt


Heat olive oil in a large saucepan over medium heat. Add onion and cook until translucent, about 5 minutes. Add squash and cook another 2 minutes; then add chicken broth and 1 cup basil leaves. Reduce heat to a simmer and cook 20 minutes.  Purée the soup in batches in a blender. Pour the soup through a strainer into a bowl, using a ladle to push any solid bits through. Add the cayenne pepper. Season with salt to taste.

Sunday, September 19, 2010

"the best tuna salad"

I'm not kidding.  I have a recipe for the tastiest, best-textured tuna salad I've ever had.  And yes, you do need a recipe for tuna salad.  Plus, making easy flavorful lunches is what I'm all about during the school year.

I've had a love/hate relationship with canned tuna over the course of my life.  When I was little, I don't think I knew that it was fish.  And once I realized that it was not some sort of canned chicken, I was done.  Since then, I've been back and forth, craving tuna salad and then taking a hiatus after gagging on the fish taste.  I recently got over my fish issues (Japan had a great deal to do with that), so I was ready to hop back on the tuna saddle.  I know that's a catfish--use your imagination.  


I have tried many different kinds of canned tuna with varied satisfaction.  At the suggestion of Cook's Country, I'm sticking with white albacore packed in water from now on.  I ate some of this on a spinach flatbread with lettuce and tomato today.  So good.

The Best Tuna Salad
from Cook's Country magazine

3 cans white albacore tuna packed in water
2 tbsp olive oil
1/4 c minced onion
2 tsp lemon juice
1/2 tsp sugar
salt & pepper
1/2 c plus 2 tbsp mayo
1 celery stalk, minced (I always skip this because I don't like crunchy tuna salad)

Drain tuna and pat dry with paper towel (so the olive oil won't bead up on the water).  Microwave olive oil and minced onion for about 2 minutes, until onion begins to soften.  Mix onion mixture with tuna, lemon juice, sugar, 1/2 tsp salt, and 1/2 tsp pepper.  Let marinate for 10 minutes.  Stir in mayonnaise.  You can add dill or roasted red peppers and capers for something different.

Oh, and by the way, this is me.

Sunday, August 29, 2010

1 chicken 4 ways: numbers 2 and 3

In the last several years, I have endeavored to make a few meals a week meatless and to make the most of our meat. Think Michael Pollan's mantra: eat meat, not too much, mostly plants. When I buy a piece or package of meat, I want it to make several meals, complementing the vegetables and starches, but not dominating the meal. It has also been important to me that the meat we do eat comes from local and humane sources. I've been heading out to a nearby butcher to get pork and whole fresh chickens. That's where I got the meat for our beer-can chicken.

A few days later, the rest of the chicken became a lunch and a dinner. Sorry about the dark photos. We've been eating really late for the last few weeks, so my natural lighting for photos has been nearly gone.


Curry Yogurt Salad
from Serious Eats

2 to 3 ounces of boneless, skinless shredded turkey or chicken or 1 shredded Quorn Naked Chik’n Cutlet
1 squeeze of lemon juice
1 pinch of salt
1 pinch of pepper
1 to 2 teaspoons of curry powder
7 ounce container of single-serve Fage 2% yogurt, or other Greek yogurt
2 tablespoons of cashews
2 tablespoons of golden raisins (sultanas)
1 pinch of nutmeg (optional)

Mix the curry powder into the Fage, add a pinch of salt or pepper to taste. Add the raisins and cashews. Add a pinch of nutmeg if desired. Squeeze lemon on the cooked, shredded Quorn or poultry. Stir into the yogurt mixture. Add more curry powder, salt, pepper, or lemon to taste. Serve on shredded lettuce or on a slice of warm cinnamon raisin bread, whole wheat bread, or Naan bread.


Minced Chicken in Lettuce Cups
from Serious Eats

I had less chicken and more mushrooms than were called for, but everything still balanced well.

2 pounds chicken, skin removed and bones removed (in my case, precooked chicken)
1 1/2 tablespoons canola oil
1 tablespoon ginger, minced
1 tablespoon oyster sauce
1/2 cup water chestnuts, drained and finely chopped
2 scallions, white part diced and green part chopped
1 cup cremini mushroom, chopped
8 leaves Boston, bibb, or iceberg lettuce
Salt and pepper

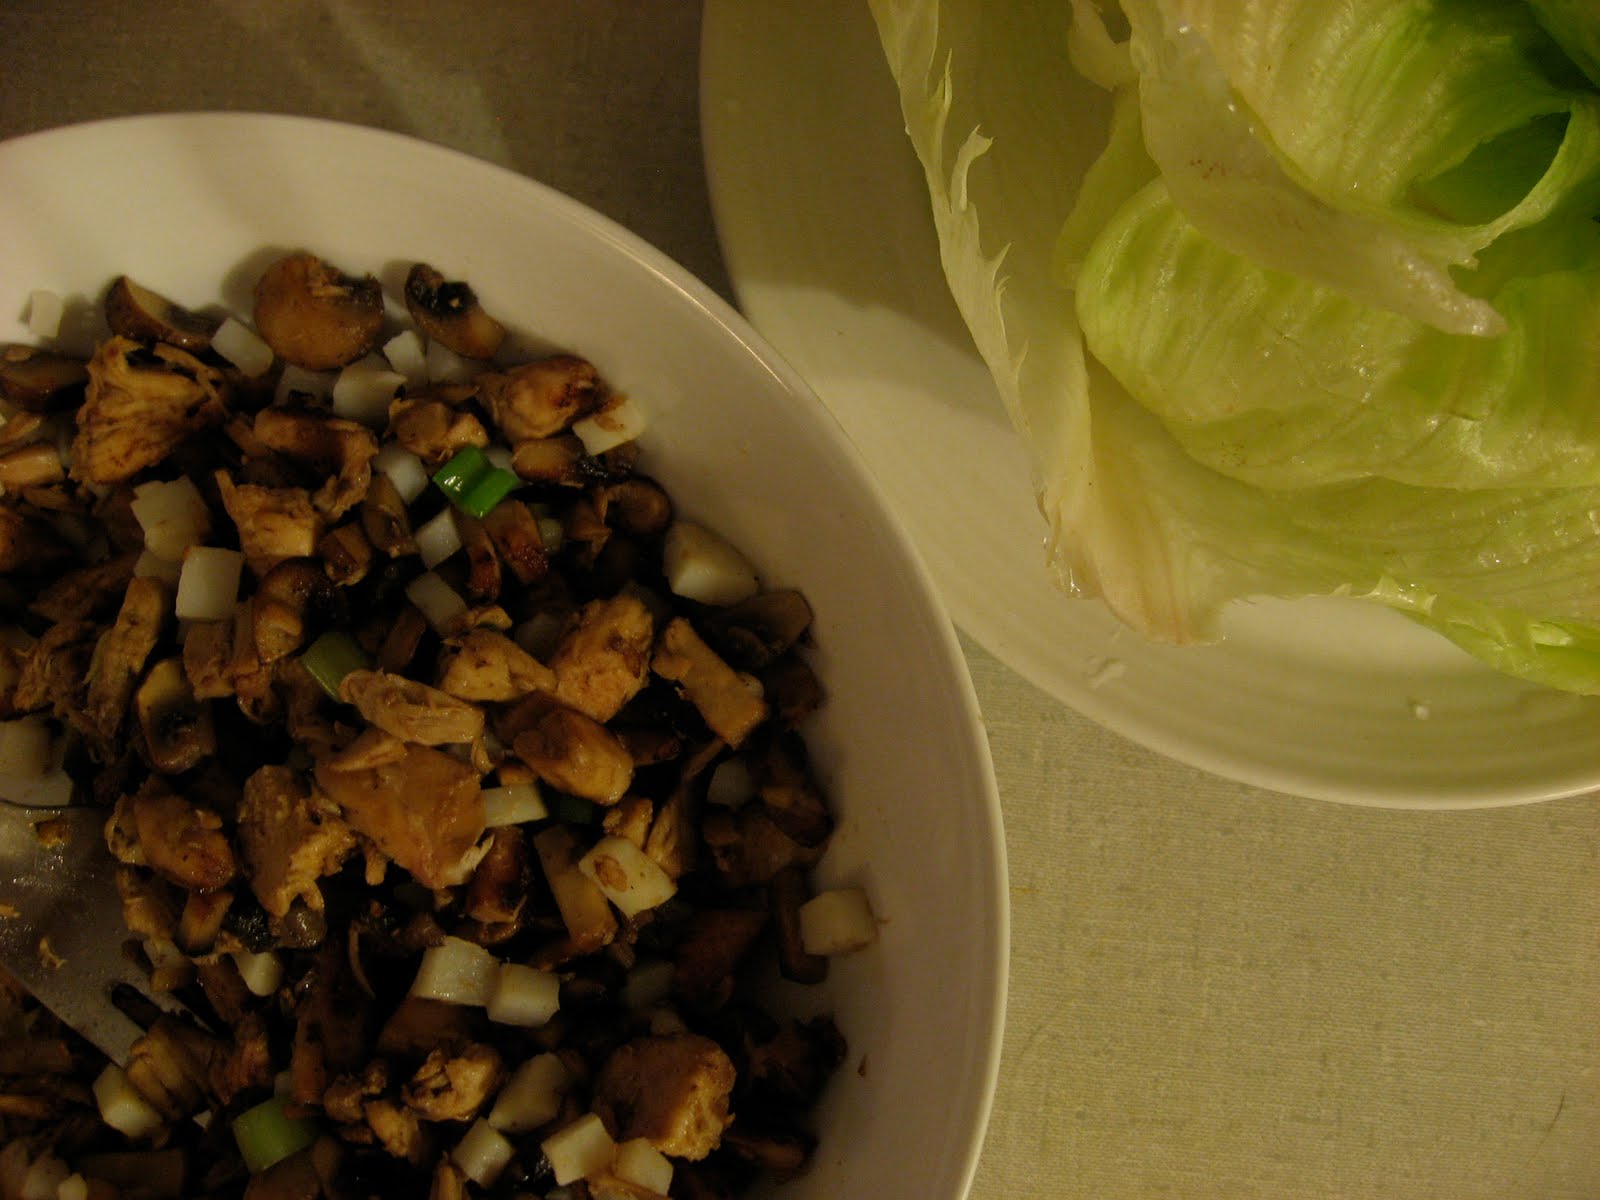
Finely dice the chicken. Pour the oil into a work or large iron skillet set over high heat. Add the ginger and scallion whites and stir-fry until fragrant, about 15 seconds. Dump in the chicken and mushrooms. Continue stirring, breaking up the chicken pieces, and cook for about a minute, or until the chicken is white and no longer raw (if using precooked chicken, just stir-fry until the chicken is warmed). Pour in the oyster sauce and cook for 2 more minutes, stirring frequently.

Remove from the heat and add the scallion greens and chopped water chestnuts. Stir until everything is combined. Season with salt if necessary. Fill each lettuce cup with a little bit of the mixture and serve.

I felt like this could have used some kind of soy-based sauce to top the lettuce cups. I liked a bit of okonomiyaki sauce and Matt used some Sichuan black bean paste. I thought something like a ponzu might be nice too. Any ideas?

Monday, August 23, 2010

1 chicken 4 ways: summer edition

At the very end of last winter I used one chicken to make three different meals, oven roasting the various parts and then making stock with the carcass. Unfortunately, just as I was getting the hang of the process, it was getting warm and I didn't want the oven on in the house. That's when we made a grilled beer-can chicken.

grilled beer-can chicken

The chicken in the picture is actually one we made back in June or July, but I forgot to get a shot of the one this week and they turned out essentially the same anyway. It doesn't look that exciting, but the skin gets nice and crispy and it has an appealing barbecued flavor. The beer (or soda, whatever you like) keeps the chicken very tender. Each time I've used a Penzey's seasoning mix, first Northwoods seasoning and then Bangkok mix. Like on an oven-roasted chicken, most of the flavor stays on the skin, so the meat does benefit from a gravy, mustard, barbecue or other sauce. There is a good set of directions for grilling a whole chicken here. The only adjustment I have made is to place a crushed garlic clove and some additional seasoning inside the can of beer.

We had a lovely dinner of about half the chicken, plus corn on the cob, grilled cherry tomatoes, and grilled brussels sprouts. Next time I'll show you the lunch, dinner, and soup I made from the rest of the chicken.